Connect Jarvio to Notion:
Run Your Amazon Workflows From Inside Notion AI

Jarvio exposes an MCP server. Notion Custom Agents can connect to it using a bearer API key. You must enable custom MCP servers in workspace settings (this requires workspace privileges), then you add the server URL + key to your Custom Agent and use it by opening a new chat with the agent.
Jarvio exposes a standard MCP (Model Context Protocol) server, and Notion Custom Agents can connect to custom MCP servers. Hook the two together and a Notion agent can pull Amazon sales, PPC, inventory, and ad data directly into the page you're writing — without you ever switching tabs. This is the same plumbing behind Amazon AI agents, just exposed in a workspace you probably already use. Here's the working setup, including the gotchas that aren't obvious from either product's UI.
One quick clarification: this guide is about connecting a Custom Agent in Notion to Jarvio via a custom MCP server (Notion calling out to Jarvio). It is not about Notion's own "Notion MCP" feature, which is how external AI tools like Claude or Cursor connect into Notion. Two different features that share three letters.
Why bother?
If you already live in Notion — for docs, plans, meeting notes, project trackers — your Jarvio Agent sits one click away in the Notion sidebar. Ask it anything you'd normally ask Jarvio: sales, PPC, inventory, advertising data, account health. If you've ever set up Amazon workflow automation through Zapier or a custom script, this is the same idea — except your AI agent is the interface and Jarvio's tools are the runtime. We'd rather show you the setup and let you find your own workflows than prescribe ours.
What you'll need
- A Jarvio account with at least one brand connected. Sign up here if you don't have one.
- A Notion workspace with custom MCP servers enabled. Notion controls who can use custom MCPs — see Notion's connections help page for current availability.
- The Notion privileges required to enable custom MCPs for the workspace, if they aren't already enabled — Step 1 explains where.
Step 1 — Enable Custom MCP Servers in your Notion workspace
Custom MCPs are off by default in Notion, and the "Add custom MCP server" option simply won't appear inside a Custom Agent's settings until they're enabled at the workspace level. Do this first — if your workspace can't enable it, no point generating an API key in Step 2.
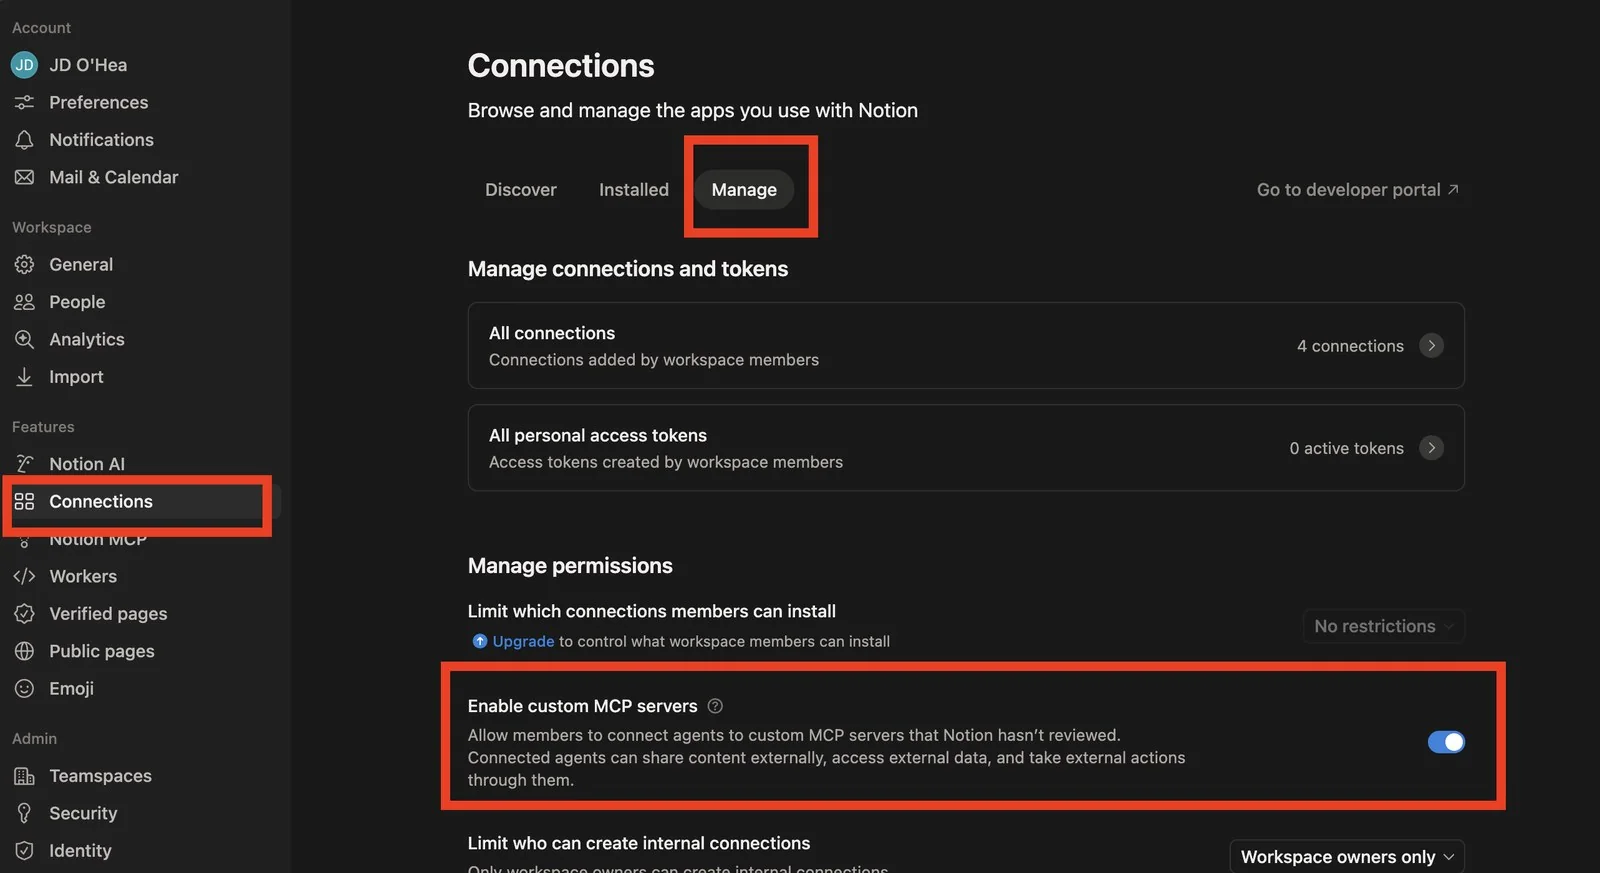
- In Notion, click your workspace name (top-left) and choose Settings.
- Open Connections in the settings sidebar, then switch to the Manage tab.
- Scroll to Manage permissions and switch on the Enable custom MCP servers toggle.
Note: You'll need the workspace privileges required to enable custom MCPs. If the toggle isn't visible or is disabled, ask whoever owns your Notion workspace to flip it. Notion's own help docs sometimes describe an older path (Notion AI → AI connectors) — the live UI as of uses Connections → Manage instead.
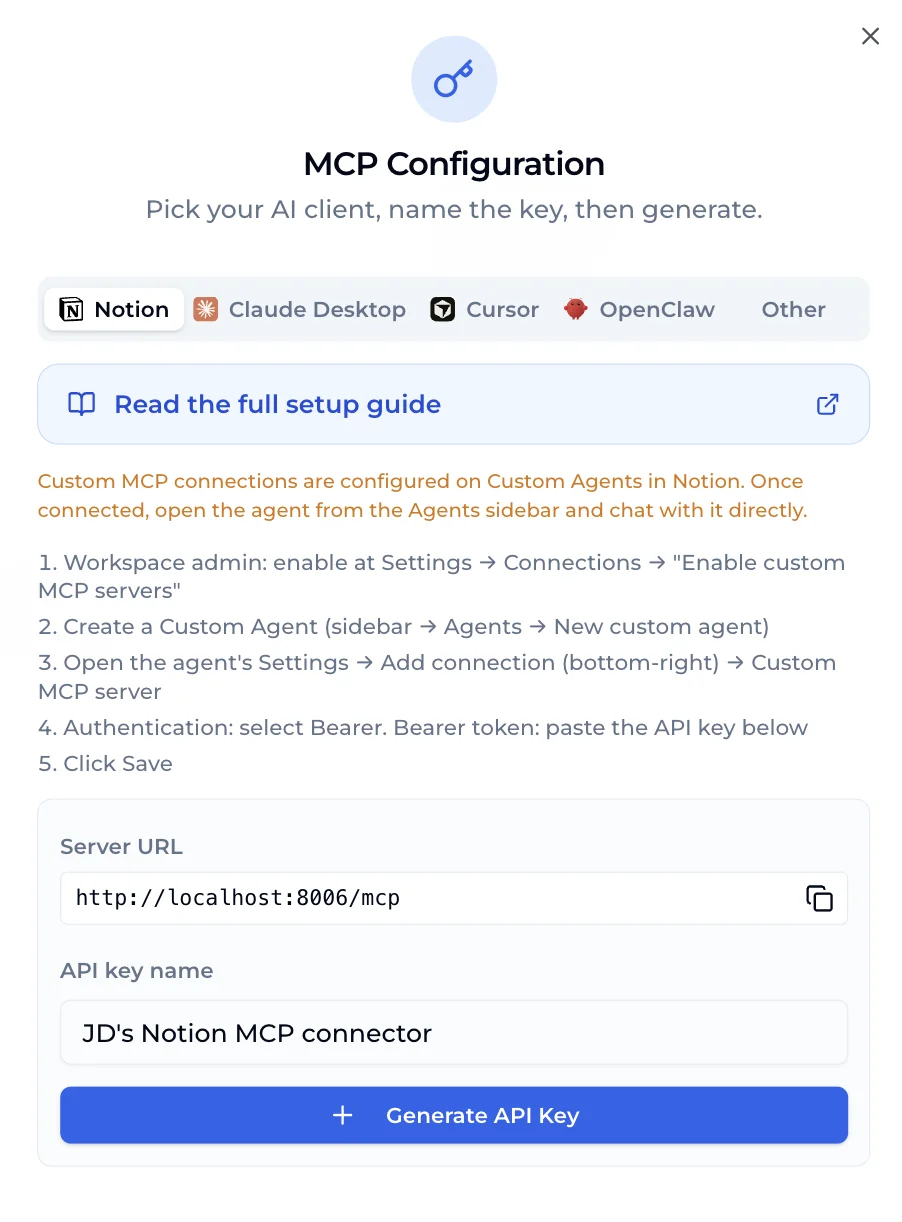
Step 2 — Generate a Jarvio MCP API key
- Log into Jarvio and open Settings → MCP — or jump straight to the Notion tab:
app.jarvio.io/org/mcp?connector=notion. - On the MCP Server card, click View Configuration. The dialog opens on the Notion tab.
- Name the key (default: Notion Connector — change to something descriptive like JD's Notion MCP connector) and click Generate API Key.
You'll then see two values:
- Server URL —
https://2api.jarvio.io/mcp - API Key — a long string starting with
jrv_…
Copy the API key right now. Jarvio only shows it once. If you lose it, generate a new one — old keys can be revoked from the same screen.
jrv_… token into Notion's connection form.Step 3 — Create a Notion Custom Agent and describe it
Jarvio attaches to a Custom Agent — the only place Notion accepts custom MCP servers today (the main Notion AI does not; see Step 5). The flow is two-phase: first describe what the agent should do, then add the MCP connection.
- In Notion, open the Agents section in the left sidebar and click New custom agent.
- Notion opens a chat input asking you to describe the agent you want to build. This is where Notion's own AI sets up the agent's name, instructions, and starting prompt for you — based on what you paste in.
- Paste the prompt below into that chat input. It includes a link to this guide so you can refer back to the MCP setup steps without losing your place.
Copy-paste prompt for Notion's "describe your agent" chat
I want to create an Amazon operations assistant powered by Jarvio. Jarvio exposes an MCP server that gives this agent tools for sales reports, PPC analysis, inventory checks, advertising data, and more.
After you set up the agent, I'll add the Jarvio MCP connection via the agent's Settings → Add connection → Custom MCP server (Bearer auth).
Setup reference: https://jarvio.io/blog/connect-jarvio-to-notion-mcp
Name the agent "Jarvio Agent".
Once Notion's AI finishes setting up the agent, continue below to wire up the connection.
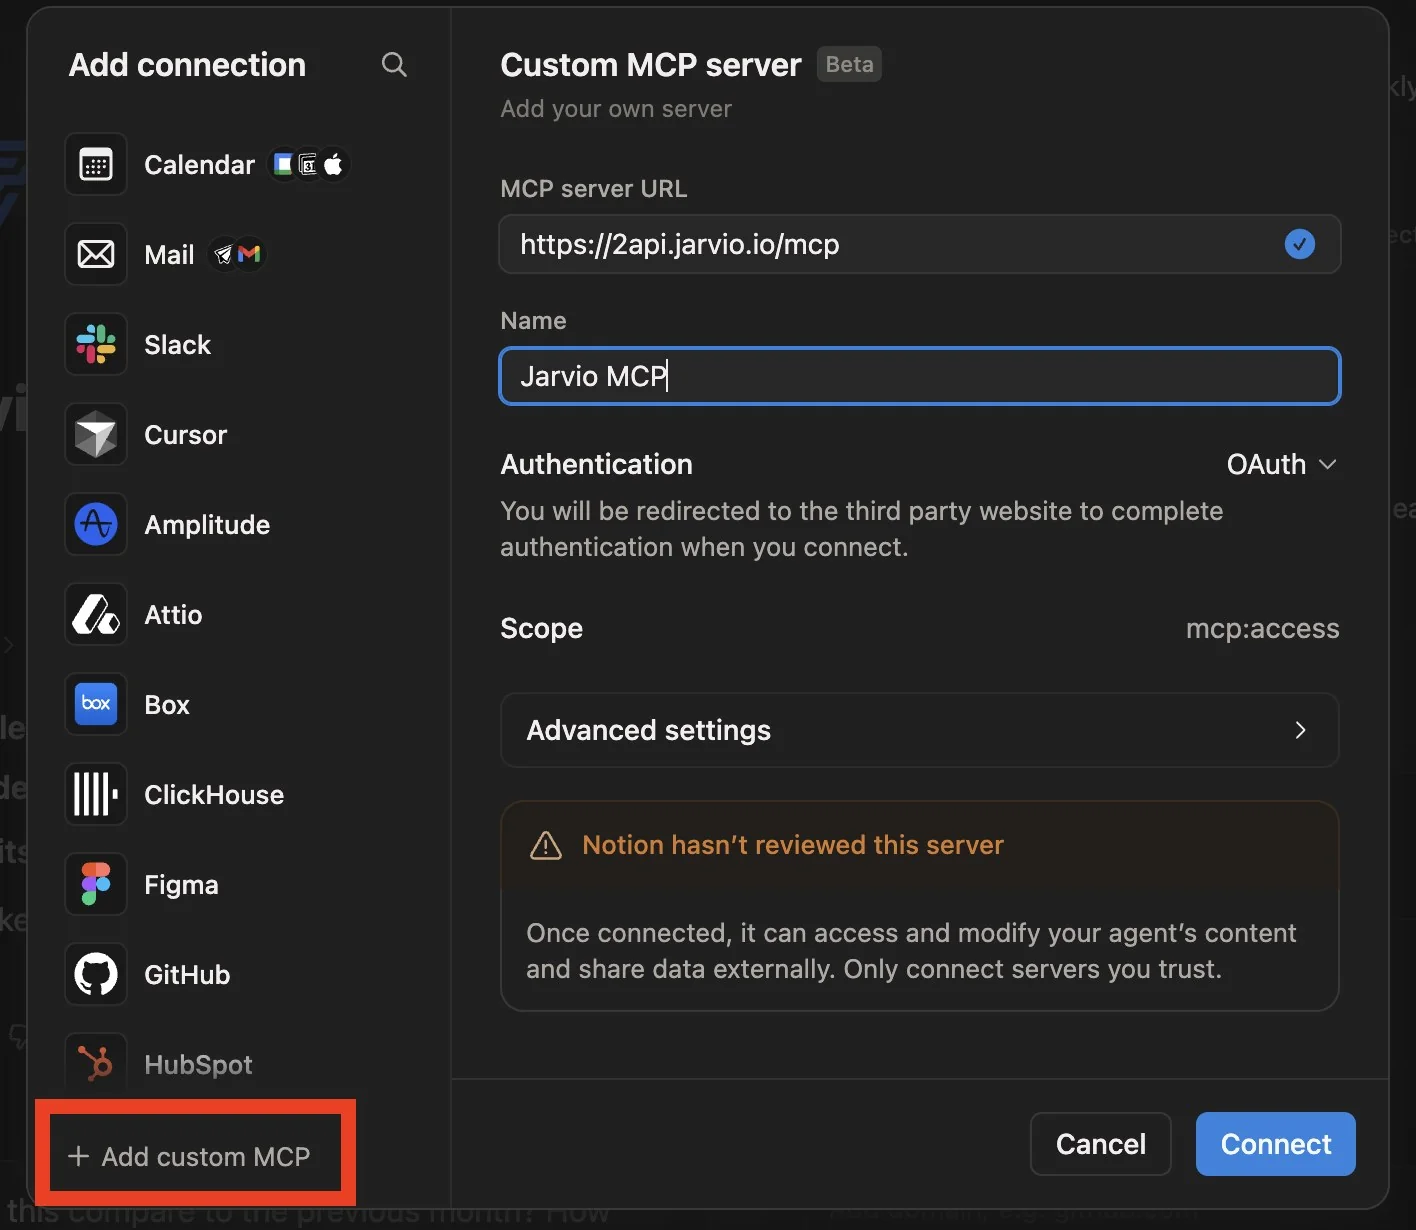
Add the Jarvio MCP connection
- Open the new agent's Settings (the gear / settings entry on the agent).
- Scroll to the bottom and click Add connection (bottom-right of the connections list).
- Choose Custom MCP server.
-
Fill in the form:
- Name:
Jarvio MCP— this is the connection label Notion stores against your agent (distinct from the agent's own name, which is Jarvio Agent from Step 3) - Server URL: the URL from Step 2 (
https://2api.jarvio.io/mcp) - Authentication: select Bearer
- Bearer token: paste the
jrv_…key from Step 2
- Name:
- Click Save.
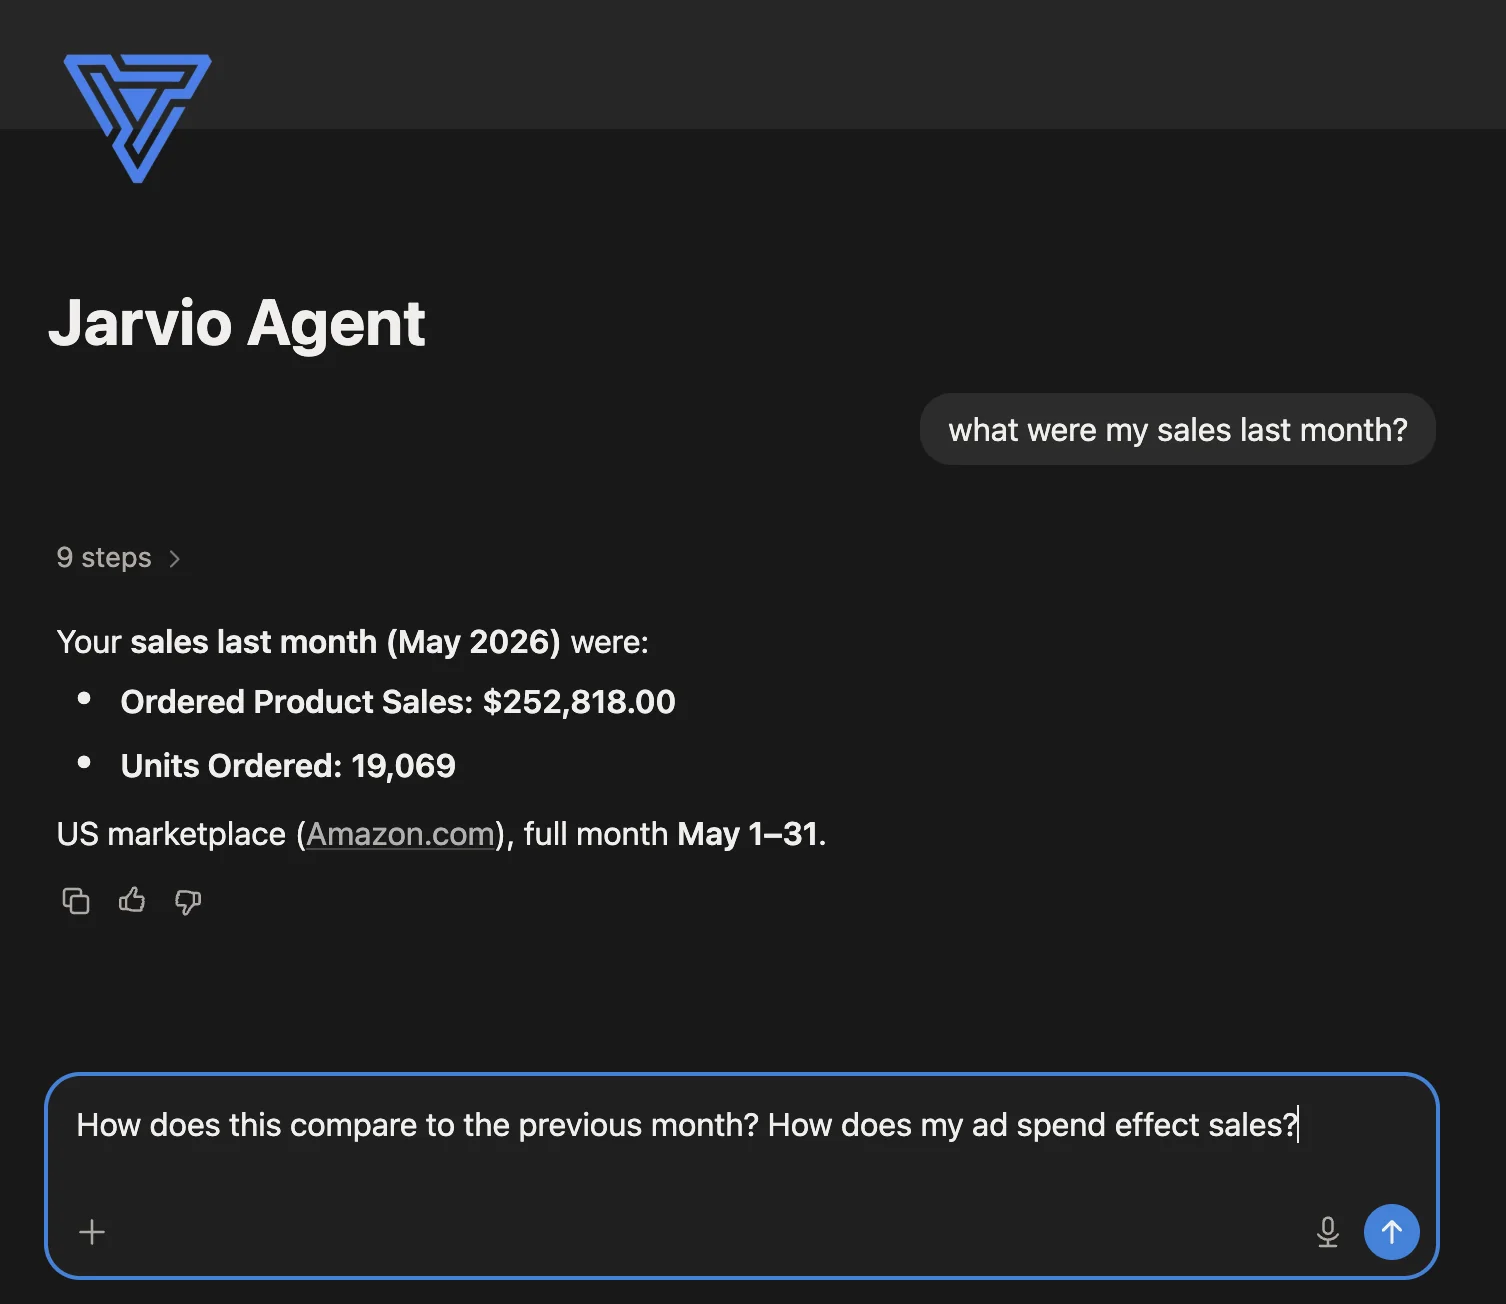
Step 4 — Use Jarvio inside Notion
Open the agent directly to use it. In Notion's Agents sidebar, click Jarvio Agent and start a new chat. That's the route we've found reliably triggers Jarvio's MCP tools. (Notion documents @-mentions and triggers as additional invocation paths, but in our testing @-mentioning the agent from a regular page didn't actually fire the tools — opening a chat with the agent is the path that works today.)
Should you talk to the main AI or the Custom Agent directly?
Always go to the Custom Agent directly. Notion's main AI (Notion Agent) and Custom Agents are separate systems — the main AI can't delegate to or call a Custom Agent for you. The docs put it plainly: "Notion Agent is on-demand, whereas Custom Agents are autonomous."
Practically:
- Asking the main Notion AI "use my Jarvio agent to pull yesterday's sales" will not work — it has no awareness of your Custom Agents.
- Instead, open the Jarvio Agent from the Agents sidebar and ask your question in its chat. The agent runs with its own MCP tools and answers in the chat.
What it looks like in practice
Open Jarvio Agent from the Agents sidebar and ask. The agent picks the right Jarvio MCP tool, calls it over the connection you configured, and answers in the chat. From there it's your sandbox — explore what Jarvio's tools can answer for your business.
Sharing the agent with your team
Notion lets you share Custom Agents with workspace members so they can interact with the agent without needing their own Jarvio API key — the agent uses the one you bound. One thing to be deliberate about: every team member who can interact with the agent effectively has access to whichever Jarvio brand the key is scoped to. If you want hard isolation per teammate, give each their own Jarvio key and have them build their own agent.
Step 5 — What about Notion's main AI?
Custom MCP connections are configured on Custom Agents (not the default Notion AI experience), so to use Jarvio tools you'll open the Jarvio-connected Custom Agent and chat with it directly. See Notion's MCP for Custom Agents docs for the current scope of where custom MCPs surface.
Worth knowing: MCP connections are configured on a per-agent basis, so each Custom Agent you want to use with Jarvio will need that connection set up. Same URL and API key — you just re-do the binding on each agent.
Troubleshooting
| Symptom | What to check |
|---|---|
| "Add custom MCP server" option doesn't appear | Custom MCP servers haven't been enabled at the workspace level yet (Step 1), or custom MCPs aren't available to this workspace. |
| Notion shows a 401 / "Unauthorized" | Token typo. Generate a new one — they're disposable. |
| Notion shows a 404 / "Not found" | URL is missing /mcp at the end, or you pasted the dashboard URL instead. |
| Connector saves but no tools appear | Token is from a brand with no integrations connected yet — connect at least one in Jarvio first. |
| Tool call hangs | Refresh the Notion page and retry. |
Sources & verification
Verified against the live Jarvio MCP server at https://2api.jarvio.io/mcp and Notion's official documentation on by the Jarvio team. Notion's MCP UI is still evolving — if you see different labels than we describe, let us know via the contact form at the bottom of this page; we update this post regularly.
- Notion — MCP connections for Custom Agents
- Notion — Custom Agents
- Notion — Connections (plan matrix)
- Notion — Security best practices for agent connections
- Model Context Protocol — specification & transports
Frequently asked questions
Is the connection secure?
Where do I use Jarvio — main Notion AI or a Custom Agent?
What happens if I lose my API key?
Does Jarvio see what I do inside Notion?

Ready to automate your Amazon operations?
Signup for freeRelated articles
How to Build an Amazon AI Agent with Claude (2026 Guide)
Want to build your own Amazon AI agent with Claude? Here's the architecture, the APIs, the edge cases, and the shortcut most sellers take instead.
AutomationHow to Build an Amazon AI Agent with OpenClaw (Full Guide)
OpenClaw lets you build a custom AI agent with Claude for Amazon automation. Here's the full setup guide, and the production-ready alternative.
AutomationWhat is an Amazon AI Agent? How It Works
Learn what an Amazon AI agent is, how it's different from dashboards and generic automation tools, and why it's becoming the new way sellers manage their operations.